How to get rid of the storyboard
Level: Beginner
Framework: UIKit
Swift: 5.0
Xcode: 11.3.1
iOS: 13.2
The Motivation
As a beginner in iOS Development learning UIKit, one of the things that get on my nerves is to use the storyboard. It seems like it has its own will, it just does what it wants every now and then.
The whole drop and drag of stuff and opening multiple windows to connect your buttons to your code is just not my cup of tea. So I started to look for alternatives.
Where can I find information on create apps without the storyboard and do everything programmatically? And guess what, that was hard to find. Most tutorials and books operate using the storyboard.
But I got you, no worries.
I can’t believe you are still talking, show me the code.
What are we going to do?
The most simple app with a cyan background color.
Its main purpose is to get you up and running without the storyboard.
What do I need to know?
I am assuming you know the basics of programming, the Swift language, and how to create and run an Xcode Project.
Let’s go
- Create a new Xcode project
- Choose
Single View App - Call it whatever you want
- Choose
Swiftas its Language andStoryboardin User Interface - Choose the location you want
- Run the app to see if everything is ok (optional)
- Choose
- Delete the storyboard and its references
- Delete the file
Main.storyboard, I usually click “Remove Reference”. - In the
GeneralPage under the sectionDeployment Infodelete ‘Main’
fromMain Interfaceand tap enter afterward.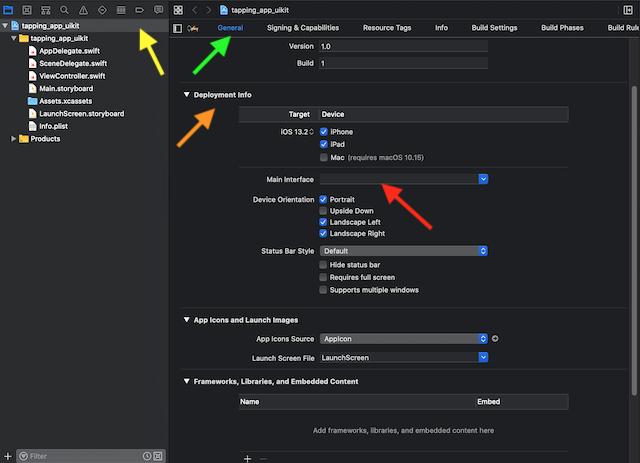
- In the
Info.plistsearch for “main” and click on the ‘minus’ button on the row you found.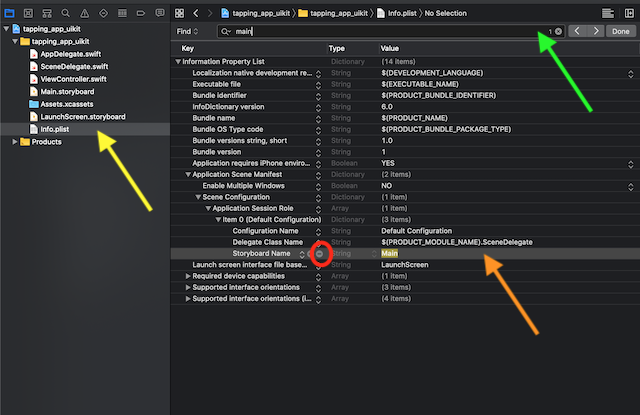
- Delete the file
What happened here?
The app’s main interface was set to be a file called Main that was our storyboard.
In the Info.plist were some reminiscents of that file so we deleted that too.
- Setup the RootViewController
InSceneDelegate.swiftwe have to declare which ViewController is going to be the root which basically tells where to look for when the app starts.
Who is this app’s root? Who controls this app’s main view? That must be the RootViewController. This is where the marathon starts. And since we deleted the storyboard where we usually had a ViewController with an arrow pointing to it, which means “I am Root”.
We need to determine who is root now.
But before we get there. What is a scene?
This discussion is deeper than I want to and can go now. So I’ll give you my simple explanation of a scene. The same app can have different instances of itself open like a browser has tabs. All of those instances are called scenes.
Apple Docs on Scenes
Don’t miss the goal.
Let’s determine who our root view controller is in the function scene under SceneDelegate.swift.
We have a window variable that gives us our current window and we also have a scene that is passed as a parameter to the function. Currently, this scene does not have a name.
 guard let _ = (scene as? UIWindowScene) else { return }
 // The underscore means this constant does not have a name.
 // But if it has no name, how can we use it?
 // How to call a dog that does not have a name?
 // All this code does is to check if there is a scene (it is not nil) and
 // if there isn't one then return right now from this function.
 // Because something must be utterly wrong, so don't continue.
 // It is a guard, which is guarding or "keeping an eye" on our scene
 // but it does not keep it somewhere so we can use it. Let's change that.
// Now we can access our scene through the constant named windowScene.
guard let windowScene = (scene as? UIWindowScene) else { return } guard let windowScene = (scene as? UIWindowScene) else { return }
// We don't have a window.
// We just have a variable declared to hold one.
// Let's initialize our variable window with an instance of UIWindow.
// If you write 'UIWindow(' and don't close the parenthesis then
// Xcode on a lucky day will show you everything that can go in there,
// which usually helps me out a lot.
// Choose the option with the argument windowScene
// and pass it our windowScene.
window = UIWindow(windowScene: windowScene) 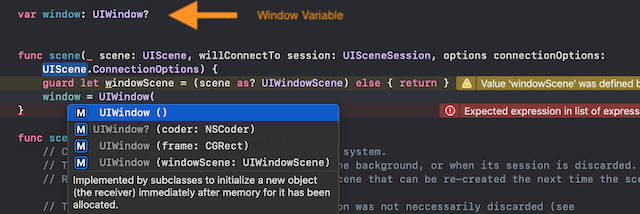
 guard let windowScene = (scene as? UIWindowScene) else { return }
 window = UIWindow(windowScene: windowScene)
 // We have a window now which is connected to our scene, remember our goal?
 // So tell our window who the rootViewController is by assigning it to an
 // instance of the ViewController that came with the project's template
 // inside a file equally named (ViewController.swift).
 window?.rootViewController = ViewController()
 guard let windowScene = (scene as? UIWindowScene) else { return }
 window = UIWindow(windowScene: windowScene)
 window?.rootViewController = ViewController()
 // Just one more step to go now. We have to make our window visible.
 window?.makeKeyAndVisible()
Done.
Code
 func scene(_ scene: UIScene, willConnectTo session: UISceneSession,
   options connectionOptions: UIScene.ConnectionOptions) {
   guard let windowScene = (scene as? UIWindowScene) else { return }
   window = UIWindow(windowScene: windowScene)
   window?.rootViewController = ViewController()
   window?.makeKeyAndVisible()
 }
Now let’s go change the background color of our rootViewController so we can see if we actually made it work. We set out rootViewController to be an instance of the ViewController class, which is inside a file also called ViewController. So we must go there to change its background.
- Change the background color of our view
- Go to the file ViewController.swift
 override func viewDidLoad() {
   super.viewDidLoad()
   // Every ViewController has access to its view.
   // This is one of the things a view controller does.
   // It manages the view.
   // And a view is mainly about looks.
   // So the background color belongs to the view.
   view.backgroundColor = .cyan
   // The backgroundColor takes an UIColor. The class UIColor has
   // some predefined color variables we can use.
   // Since backgroundColor takes an UIColor, we can get away with '.cyan'
   // instead of 'UIColor.cyan'
 }
Finish
Congrats, you are done. Run the app and you should see a cyan background color.
Now what?
Soon, I’ll show you how to change this app’s background color by tapping on the screen.